Tuesday, 17 June 2008

Something new: Chickpea and pumpkin salad + little strawberry tartlets


Back in the groove here, and i've got a couple of recipes to share that i decided to try out tonite. The first is a warm salad, complements of one of my fave books: Casa Moro. For pud, the recipe is complements of the June 2008 issue of olive magazine. Both have made it into the 'keeper' category of my recipe database.
We drank a really crisp Sauvignon Blanc with the meal -- see the photo above. It worked perfect with the lemony tahini sauce.

Chickpea and pumpkin salad with tahini sauce
Serves 4

For the salad:
1 kg pumpkin, peeled, seeded and cut into 3cm cubes
1/2 tsp ground allspice
1 garlic clove, crushed (i used 4)
salt
pepper
olive oil
1/2 red onion, finely chopped
250g cooked chickpeas or 1 400g tin drained
4 Tbsp roughly chopped coriander

For the tahini sauce:
1 garlic clove, crushed into a paste with salt
3-1/2 Tbsp lemon juice (i used juice of 1 lemon)
3 Tbsp tahini
3 Tbsp water
2 Tbsp olive oil


  1. Preheat the oven to 220C. Toss the pumpkin cubes with allspice, garlic, salt, pepper and olive oil and spread out on a baking tray. Bake in the oven for 15-25 minutes or until the pumpkin is tender.

  2. While the pumpkin is cooking prepare the tahini sauce. Mix together the garlic paste, lemon juice and tahini until combined. Thin to desired consistency with water. Finally, stir in 2 Tbsp olive oil. You want to be able to drizzle the finished sauce and it should be balanced between the lemon flavour and the tahini flavour.

  3. When the pumpkin is done, mix in a bowl with the onion, chickpeas, chopped coriander and season to taste with salt and pepper.

  4. To serve, transfer the salad to a shallow serving bowl and drizzle with the tahini sauce. NOTE: i served this with couscous


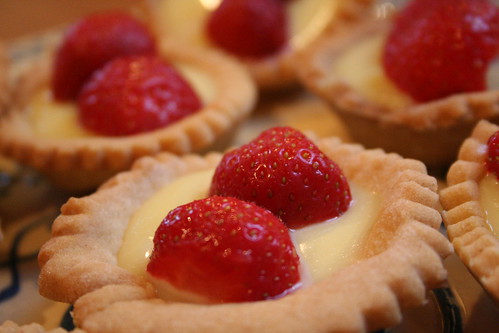
Mini strawberry tartlets

For the tartlet cases:
180g plain flour
1 Tbsp chopped hazelnuts
60g icing sugar
90g chilled butter, diced
1 egg

For the filling:
150ml double cream
200g white chocolate

To serve:
strawberries, halved


  1. Preheat the oven to 180C/fan 160C. First make the pastry. Whizz together the flour, hazelnuts and icing sugar together with the diced butter in a food processor until it resembles fine breadcrumbs. With the machine on, add the egg and process until it forms a ball of dough. If the mix doesn't come together in a ball add a splash of ice water.

  2. Roll the dough out on a floured surface until thin. Cut out 16-24 small circles and place the circles in the holes of a tartlet mould or mini-muffin pan. Chill the cases in the freezer for 20 minutes. NOTE: i was able to get 16 tartlet cases, but probably could have gotten more had i rolled the dough out thinner.

  3. Remove the cases from the freezer and bake in the preheated oven for 15 minutes or until light brown. Cool on a cooling rack.

  4. While the cases are cooling make the filling. Heat the double cream over a bowl of simmering water and add the chopped chocolate. Whisk constantly until well incorporated. Pour into the tartlet cases and chill in the fridge for at least an hour.

  5. To serve, halve a strawberry and poke into the tartlet filling.

lornas birthday posh nosh


last friday we were invited to michael caines at abode restaurant. it was for lorna's birthday posh nosh meal. the food was fab. the restaurant was half empty but we were pampered. not true to form tho i forgot to bring my camera so thanks to lorna for providing these pics via karen and antonia. on the left is melon soup with parma ham foam. on the right is halibut. i had the beef which was excellent but i couldnt finish. the meal started with mc blanc de blancs champers which according to the people sat at the table either smelled like grass or toasted almond biscuits. i was in the latter category. they have a good choice on their wine list too and myself and lorna's brother, roger, were assigned the task of choosing. a rioja for the red and italian pino grigio for the white. and no i cant remember the exact wineries. i didnt have my camera or a note book!!! we had other mise en bouche which means put in the mouth,
and amuse bouche which means please the mouth. foam was the talk of the table! well at least tween me, mel and roger. according to wikipedia foam is a culinary technique invented by Spanish chef Ferran Adrià and consist of natural flavors (like fruit juices, savory essences) mixed with a gelling agent such as agar, and extruded through a whipped cream canister equipped with N2O cartridges. Foams have been described as "airy," with the flavor taking precedence over the substance it is suspended in. oooo errr missus. mel and roger reckoned we could make a fortune with foam bars. look out new york city we are gotta beat you to it!!!

lunch in san jose


lunch in san jose
Originally uploaded by silamuta
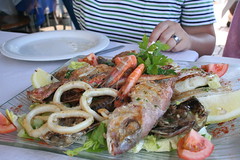
mel and i recently returned from a holiday in cabo de gata natural park in the south of spain. The world is lucky that this part of spain was never developed for tourism. This was due mainly to the fact the area is so arid and that it would have been too much work to figure out how to get enough water to the place. So somebody came up with the idea to protect the area instead. fab coz when they finally figured out how to get water there it was too late. the area was already protected and now they cant touch it. unfortunately tho the area just outside the park is covered in poly tunnels which totally spoils the landscape. the spanish are divided over the use of poly tunnels. many claiming it brings industry and money into the area. part of the organic box scheme we get each week comes from a poly tunnel farm near almeria. i dont know enough about it to judge at the moment. all i do know is that i like my tomatoes and other veggies to have the sun touch em and affect the taste. anyhoo. i have long been tempting mel with the idea of grilled fish in the south of spain. one of my experiences of traveling in spain on my own involved walking along the coastline and tasting the sardines cooked fresh on the beach in little chiringitos. so yes we had lots of grilled fish in cabo de gata along with paella, meats and cheeses and lots and lots of wine. mel will elaborate more on all what we had later. for the meantime enjoy these pics.
also check out http://www.degata.com/eng/
and
http://www.andalucia.com/environment/protect/cabodegata.htm

Saturday, 17 May 2008

Happiness is grilled mushrooms


As i said in my previous post, we were blessed with a gorgeous week which meant I was grilling on the barbecue almost every night. I had begun the week with burgers and wings and by the end of the week was wanting a break from meat. Something magical happens when you first marinate these field mushrooms and then grill them. All the earthiness from the mushrooms combines with the smoke and heat of the grill. I had some rocket and made rocket pesto, added a dollop of goats cheese and served the shrooms with leftover wings, grilled bread and a nice herb salad. Yummm!

Grilled mushrooms with rocket pesto
serves 4 as a starter or 2 as a main

4 large flat field mushrooms or portabella mushrooms
olive oil
balsamic vinegar
2 cloves garlic, crushed
goats cheese

For the pesto:
150g rocket
2 cloves garlic, crushed
handful pine nuts
grated parmesan cheese
olive oil

To serve:
sliced ciabatta bread or baguette, lightly toasted or grilled
herb salad


  1. First marinate the mushrooms. Combine a good glug of olive oil, another good glug of balsamic vinegar, the crushed garlic, and salt and pepper in a shallow bowl. Put the mushrooms in the marinade and turn to make sure they're well coated. Leave for 30 minutes. Prepare the barbecue or heat a grill pan.

  2. Make the rocket pesto. In a food processor combine the rocket, pine nuts, grated cheese, and crushed garlic. With the machine turned on, slowly drizzle in extra virgin olive oil until the mixture becomes a smooth paste. Season to taste with salt and pepper.

  3. Grill the mushrooms gill side down first for 2-3 minutes depending on how large they are. Turn the mushroom over and grill the other side. Crumble goats cheese on top during the last minute so that it starts to melt. Also grill the bread lightly on both side.

  4. Lightly dress the salad leaves with vinaigrette. Arrange the salad leaves on a plate and place the mushrooms on top of the salad. Add a generous dollop of rocket pesto to each mushroom and serve.

Monday, 12 May 2008

Summer = Salad Nicoise


We were way lucky in Glasgow last week. Full-on sun, temps in the low 20s, and blue blue sky. I couldn't stay away from the barbecue all week. Saturday rolled around and well, it got grey. But nevermind, I still have summer and sun on my mind. What better way to herald it than my take on salad nicoise with grilled tuna steaks. All that was missing this go round were some anchovies (i just plain forgot!) and super chilled rose. But really, it just wasn't warm enough for the rose yet. Maybe next week???

Salad Nicoise (4 servings)
For the tuna:
2 tuna steaks
lemon juice
olive oil
salt and pepper
chopped parsley

For the salad:
3 eggs
large handful of fresh green beans
large handful of cherry tomatoes
large handful of black olives
500g salad potatoes

For the vinaigrette: (note this makes enough enough for a few weeks)
1/2 cup red wine vinegar
2 Tbsp Dijon mustard
1 tsp salt
2 tsp caster sugar
dried oregano/basil/thyme
freshly ground black pepper
1 cup olive oil


  1. Juice the lemon and combine the lemon juice with a good glug of olive oil. Season the tuna steaks well and put in the oil to marinate while you prepare the other ingredients. Make sure both sides of the steak come in contact with the marinade.

  2. Prepare the vinaigrette. In a small bowl whisk together the red wine vinegar, mustard, salt, sugar and herbs. Whisk in the olive oil until emulsified. Note: i use a large squeezy bottle for this and just combine all the ingredients in it and shake well.

  3. Put the potatoes in a pot and just cover with cold water. Add a pinch of salt. Bring to the boil and simmer until just tender (about 10-12 minutes). Drain and when cool enough to handle, cut in half and put in a large bowl. Toss with a generous drizzle of the vinaigrette while still warm.

  4. Meanwhile hard boil the eggs. Bring a small pot of water to the boil and add the eggs to it. Boil for 10 minutes. Top and tail the green beans and add to the boiling water for the last 4 minutes. Remove the beans and blanch under cold water. Add to the bowl of potatoes. Shell the eggs and cut into quarters. Set aside.

  5. Quarter the tomatoes and add to the bowl of potatoes along with the olives. Drizzle on some more vinaigrette and toss everything together until well combined. Transfer to a serving platter.

  6. Heat a grill pan until very hot and sear the tuna steaks for about 2 minutes max on each side. You want it to still be pink in the middle. Lay the steaks on top of the salad, sprinkle with the chopped parsley and arrange the hard boiled egg quarters around the dish.

Sunday, 27 April 2008

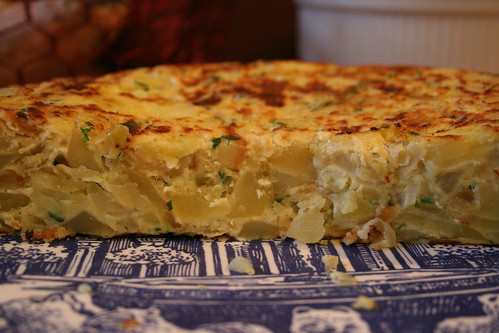
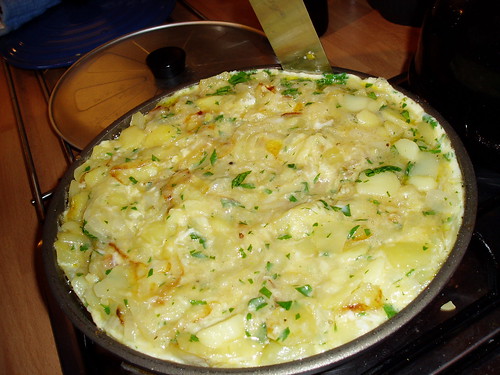
Tortilla: it's all about the lid


I had big plans for cooking last Sunday. I was going to make Minestrone for my lunches, and pumpkin ravioli for our dinner. The minestrone took longer than i expected, and by the time it was ticking away on the stove i couldn't be bothered to make the raviolis. So i decided to do tortilla and salad.

Tortilla is one of our regular stand-bys, like Sag Paneer. It's one of those dishes that define us in a way. Kelsie even included making tortilla in one of her film projects. Anyways, lately i've been having conversations with some of my work mates about how to make tortilla and what can go wrong. I thought i'd document how i do it, and hope it helps.

Here are some tips that i've picked up either from other people or by trial and error:

  • Make sure you use the right proportion of eggs to potatoes and onion. Use way more potatoes and onion than egg. The quantities in the recipe below work with a 9" frying pan. If your pan is smaller or larger, adjust quantities as necessary.

  • Cook the potatoes and onion really slowly. It usually takes about 20 minutes. You don't want them to brown, just to become tender. The longer you cook the onions the sweeter, less oniony they'll taste.

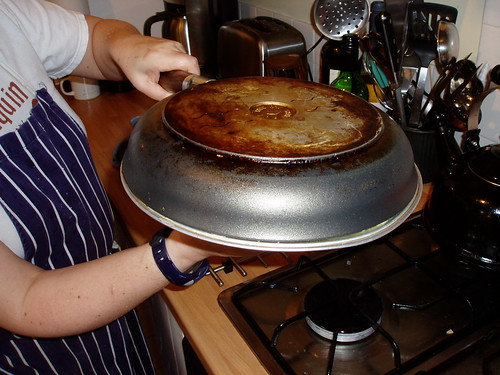
  • It's all about the lid. For perfect tortilla flipping you need a flat lid that is the exact diameter of the pan you're using. In Spain they sell tortilla flipping pan lids. My ma got me the one i use and it works great -- no drips and the tortilla slides back into the pan really easily.

  • When you're flipping the tortilla don't freak out. I know this is a strange tip, but i've found the more you hesitate when you're flipping the tortilla the more chance you have of messing it up. Have faith in your trusted tortilla flipping lid, and go for it!


Tortilla Espanola
800g potatoes, peeled
2 large onions, cut in half and sliced
olive oil
salt and pepper
handful of chopped parsley (optional)
6 eggs


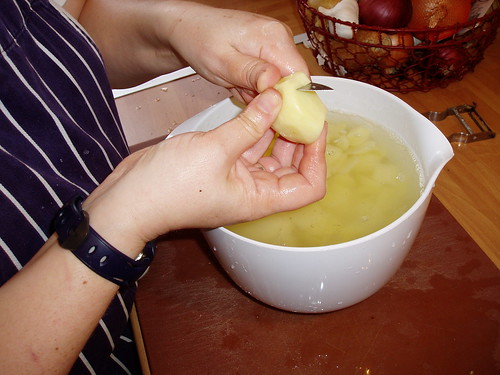
  1. Cut the potatoes into small pieces. Use a paring knife and slice off little chips of the potato. They don't need to be uniform, just more or less the same thickness.

  2. Place the potatoes and onions in your frying pan and add olive oil. I usually make sure the olive oil comes about halfway up the sides of the pan. There should be enough onions and potatoes to fill the pan. Turn the heat on low and cover. Cook for about 20 minutes, until the potatoes and onions are tender. Stir from time to time.

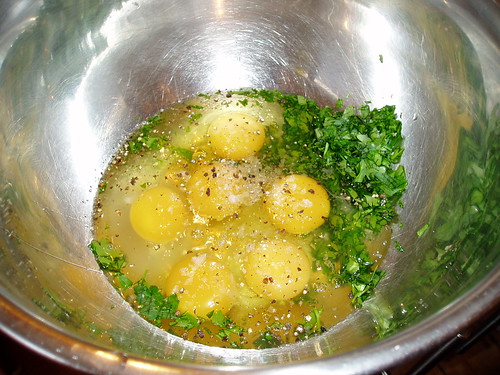
  3. While the onions and potatoes are cooking, put the eggs in a large bowl and beat with salt and pepper to taste. Stir in the chopped parsley if using.

  4. When the onions and potatoes are ready, drain them and reserve the olive oil. Add them to the eggs and mix well.

  5. Add some of the reserved olive oil to the pan and turn the heat on medium. Add the egg mixture back to the pan and cook until set. Periodically run a knife around the outside edge of the eggs to make sure they're not sticking. You want to cook the eggs until nicely browned.

  6. Flip the tortilla. place the lid on the pan, turn the pan over so the tortilla is sitting on it, and quickly slide back into the frying pan.


  7. Cook until the second side is set and browned. Turn out onto a serving dish and enjoy! Note: we usually serve this with some mayo on the side.

Wednesday, 9 April 2008

Guest post: A Day at Nick Nairn's Cook School


Today's posting was writting by our friend Lindsay, who was lucky enough to spend a day at Nick Nairn's Cook School up near Aberfoyle at Lake of Mentieth.

Here's what she has to say about her day:


Course: More Modern Scottish Cookery:
You are asked to arrive about 9.45 in the morning for coffee and biscuits with your fellow cooks. A lot of people were there with friends but there were quite a few of us there on our own and we paired up before heading into the kitchen.

The kitchen is amazing and is set up to have a demo kitchen at the top of the room (with a giant mirror over it so you can see into the chefs pots as they cook) and lots of sub kitchens (one for every 2 people) that each have a huge gas range cooker, sink and drawers with all the implements and equipment that you need.

For the 1st few hours we watched the chefs make a Langoustine bisque (which we later used to make our main course), a cardamom custard and chocolate sauce.

We stopped at about 12.30 for scones with jam and cream and a cup of tea. Then we got back into the kitchen to start cooking.

We made scallops with black pudding for starter and while the handling of the live scallops was not for the squeamish, the dish was easy to do and looked very impressive. I don't like black pudding but the Stornoway black pudding they used was fantastic and I am now a convert.

For the main course we made a fish stew type thing with coconut milk, chilli and coriander. It was really tasty.

The pudding was sensational. We made individual soft chocolate cakes to go with the custard and chocolate sauce the chefs made earlier. They served it all with a dollop of marmalade ice cream that they made the day before and while I don't like marmalade, it is one of the nicest ice creams I have ever tasted and offset the pudding perfectly. The chefs thought that we might struggle to eat the cake as the whole thing is quite rich and we had eaten a lot at that point. A second one might have taken longer than the 10 seconds it took to scoff the first one, but it could have been done!

Wine is served throughout the day with the food which you eat at big dining tables. Before you make anything the chefs demo it and then walk around while you cook to give you a hand. We were really lucky and got both chefs (John and Andy) as you usually only get one per class. They were great fun and couldn't have been more helpful.

The day ends at about 5.30pm and you then have to try and restrain yourself in the shop they have which sells everything from range cookers to kitchen utensils, books and ingredients. If you left the car at home and are drinking wine, then leave your credit cards too!!

It is expensive so not something you would do too often, and most people had been given it as a present like I was. But I couldn't recommend it highly enough, and whether you think you think you should be on Masterchef or have trouble boiling an egg, you will have a fantastic day and come away itching to have friends round for dinner so you can show off what you learned.

http://www.nicknairncookschool.com